My ‘Infographic’ CV
At the time of writing this I am coming towards the end of my MSc course and am expected to begin searching for a job for after I graduate.
In my experience the whole searching and applying for jobs experience takes a lot of motivation to do properly, especially if you’re customising your CV and writing individual cover-letters for each job.
I was recently looking through the internet at ways I could make my CV standout when applying for jobs and came across the idea of an ‘infographic’ CV. Usually ‘infographics’ themselves are used to relay large amounts of information in an attractive way, and some do so really effectively in their use of graphs and imaginative charts.
This classic example of an infographic CV by Chris Spurlock who apparently got a lot of job offers when he spread it around the social ‘blogosphere’. Since then there have been loads more people who have adapted their CVs in an incredible variety of styles (check out this page on coolinfographics.com for examples of some great ones).
Even though most of these CVs are for people working in some kind of design industry, I found myself with a spare afternoon and thought I’d give it a go myself! Using some of the infographic CVs I’d seen as inspiration, I knocked this infographic of my CV up using GIMP. I’m quite proud of it as it’s my first attempt, let me know what you think!
(Obviously it’s not my real details, but you get the idea).
Hope you enjoy it and may find it useful. Always a pleasure.
Ste
A Procrastinator’s Guide to Revision
Exams are an unavoidable part of life for most students, and so it figures that we should be taught how to revise properly, right? Well if your experience was anything like mine you were just told “to revise”, but given no clear direction how to revise. Well after years of experimenting with different methods I’ve finally found a way that works for me, and I thought I’d share it here. Who knows one day a stressed-out student may find their way here and it may help them out.
STEP 1: Make a timetable
This isn’t a new idea, however actually sitting down and writing it out and sticking to a timetable has helped me keep the procrastinator inside of me quiet. It seriously helps and lets you focus. HOWEVER there are a few key rules that I use when making my timetable:
- Study in blocks. It’s very difficult to concentrate for more than 1 hour on a single subject, so after you’ve studied one subject in your first block, change subject in your second block. Make a step-by-step plan.
- Be consistent. I have found that I can keep decent concentration in a revision setting for about 45-60 minutes at a time. So for ease I make each block 50 minutes long, with a 10 minute break.
- Take breaks. Make sure you stop what you’re doing when your alarm goes off and do something completely different and unrelated to revision; this gives your mind time to process it and refreshes you for the next session. (I’ve found that playing on my guitar, playing at my basketball hoop or even doing chores like washing up are good break activities.)
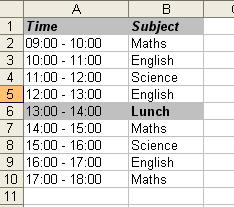
(Basic timetable example, you can actually got a lot done in a day – don’t forget to take the breaks though!)
STEP 2: Sort out your revision area

Having a quiet area free from distractions is ideal for revision. However, if you’re an extravert like me that needs that extra stimulation to concentrate then incorporate that in to your area.
- Make sure it’s clean and uncluttered. For me any mess is a distraction, so I either clean up, or move it out of sight.
- Make sure you’re comfortable. I either revise at my desk, or sat up on my bed; wherever you revise you’re going to be sitting in the same place for 50 minutes, so make sure you’re comfortable. (I’ve actually read that revising outside is really good, but have never tried it myself)
- Get free from noise distractions. For some people this’ll mean silence, and that’s all good as long as you can concentrate. For me silence is deafening and there’s not enough stimulation for me to concentrate, I have to have music in the background. Anything without words and not too loud is great for revision. (I’d recommend Andy McKee, or anything like chilled out classical music)
- Get the atmosphere right. Lighting is the first thing here, natural light if you can, but make sure it’s not too dark so that you have to squint. (This next bit will sound weird) Even try a scented candle! I’m not sure why this works for me, whether it’s the constant olfactory stimulation, or whether I just find it relaxing, but it helps me!
STEP 3: Stop surfing the net!
This one is an obvious one. It’s way to easy to just think “I’ll just have a quick look on Facebook” and then realise 30 minutes late that you’re on Wikipedia learning all about the Platypus (which by the way you should do, they’re awesome). If however the internet is part of your revision then try and limit the distractions available to you.
BONUS TIP – I’ve actually found the new Google Chrome amazing for this as you can have different user accounts on there. So I have one normal account, and then one account just for work, with all the journal databases, google scholar etc that I need for work… but with NO Facebook! :p
STEP 4: Reward yourself.
Revision is difficult, so after you’ve completed one of the major topics you’ve set as a goal, make sure you reward yourself! Not only are rewards fun, but your brain may even begin to associate hard work with rewards and begin to make revision a bit easier for you. (You can always hope!)
STEP 5: Get some gum!

Chewing gum has actually been shown to improve your cognitive functioning, and it definitely helps me with revision and in exams as well.
Well, there you have it! Those are some of the techniques I have used that has helped me in my revision and has kept me concentrating for the amount of time I need to (which is no easy thing I tell you!). Hopefully that might help some of you in the future.
Don’t stress too much and good luck with your revision!
Ste
Project 8:36pm
I’ve decided to take part in a one-year project where I take a picture of what I’m doing at 8:36pm every day and share it online.
I’ve taken the idea from prolific blogger ‘Buster Benson’ who’s blog I stumbled across yesterday and found out about his 8:36pm project. It is an interesting idea and so I thought I’d give it a go! Let’s see where it takes me!
Today’s is already up on my flickr, and I’ll be updating it everyday, so hopefully soon it’ll get more interesting. Maybe try it for yourself?
UPDATE: I probably should have realised that it probably wouldn’t be the best time to start a project like this around my exams. I’ll start it up again on 27th January after I finish – nobody wants to see photos of loads of text books.
Ste
My Photo Stream: http://www.flickr.com/photos/kaluuja/
And here’s Buster Benson’s 8:36pm Stream if you’re interested (he’s been doing it for a long time!): http://www.flickr.com/search/?q=8%3A36pm&w=35034346886%40N01&z=e&s=rec
New Discoveries – Dropbox and Grooveshark
UPDATE: As I’m now actually on my course and studying, I thought I’d bring you a couple of other free downloads in addition to my download guide that I seem to be using quite a bit during my studies.
Dropbox – When I’m going in to university/work I’m the kind of person that frequently forgets to bring my flash-drive that contains all my work that I need for the day. This isn’t the most ideal situation, especially if you’re engaged in any kind of group work. So it was with great joy that I found Dropbox, which is essentially an online-storage account for your files, and best of all, it’s free!
When you sign up you get 2gig free and the ability to organised your own files and folders within your dropbox. It is set up as a normal folder on your home PC which can be downloaded to any other PC you have access to, and so you just simply save a file to it as you normally would and it syncs with all your other devices automatically (as long as you have an internet connection).
You don’t even have to download the software (although I’d recommend it on your home PC), you can access your account through a browser on a work/library/university PC and still make the changes you normally would.
One of the most useful features I’ve found for it (I do a lot of group work on my course) is that you can set up a shared folder and send an invite to select people with in your group. We use this for sharing articles and documents in our group, but you could share pictures with family, videos with your friends etc.
It’s very highly recommended, and has made my life a whole lot easier when it comes to studying. I’ll never have to email myself again!
For your FREE 2gb of space at Dropbox, follow the link! (Download Link)
 Grooveshark – Although I waxed lyrical about Spotify in my guide, I recently was stopped listening to a song because I’d listened to it 5 times before (not in a row)… Now if I like a song, I’m going to listen to it more than 5 times so I went looking for an alternative and I found something that suits me a lot better. Grooveshark is similar to Spotify in that you can stream music for free, however there is no software (meaning you can stream it from your browser… handy for listening to tunes in the library) and also no adverts! You can still create your own playlists, shuffle, loop etc. everything you’d expect from a music player and I haven’t been disappointed yet by them limiting my play count!
If you’re wanting a Spotify alternative that lets you listen to your favourite song more than 5 times, has no adverts and is still free, then give it a try! I’ve now stopped using Spotify in favour of it. (Download Link)
Try them out… let me know what you think!
Always a pleasure,
Free Software Download Guide for Students
<Update (12/09/11) – Added Microsoft Security Essentials>
I have recently decided to return to university to do a post graduate course (which is why I haven’t had time to post for a while!). The prospect of being a student again, although exciting, means that I’m going to have to watch my pennies even more.
I decided that it’s time for a new start and so I dusted off my old laptop, wiped the hard drive and began thinking of all the programs I’d need to install for my studies and everyday life as a student.
The list is quite extensive for the modern student, and the costs of all the programs can pile up quickly… so I decided instead of spending all this money I didn’t have, I’d do a little research to see what I could get (legally) for free.
So I thought I’d help people on the way and share the Kaluuja guide to:
The Free Software Download Guide for Students (on windows)
So the following is a list to help you out with programs you might need during your time at university. It’s designed with students in mind, but if you’re not a student and want to save soem pennies then it will be helpful to you too. I’ve given links to the websites for easy access as well, so try them out and let me know what you think!
 Libre Office – Not all of us can afford Microsoft Office, but it’s very difficult (especially if you’re a student) to manage without it, and at around £70 for the latest version, that’s a chunk of your budget you could probably do with not spending. So I’ve found Libre Office to be a great, FREE alternative that allows you to open and save in Microsoft Office formats! (Download Link)
 Sumatra PDF – You’ll probably be using PDFs at some point during your student career and I’ve found that Adobe Reader just sucks the life out of my computer, takes ages to load and seems to need to update constantly. I’ve tried a few others that you might want to look at (such as FoxIT Reader and Cool PDF Reader) but I’ve found that Sumatra is a much lighter alternative and suits my needs perfectly. (Download Link)
 Thunderbird – I honestly think that Thunderbird is better than Outlook, and it’s free! It’s highly customisable, you can still view your mail offline, and you can easily link most online email accounts to it. I have two gmail accounts synched to mine at home, and it works perfectly (by the way, if you’re a new student and you’re still using your hotmail account from when you were 14 that looks something like xx-pinkladyprincesscutie-xx@hotmail then I’d recommend changing it!). (Download Link)
 Firefox/Chrome – I have been using the Mozilla combo of Firefox and Thunderbird for years, and have been very happy with both. They’re free and easily customisable with different skins, themes and add-ons, and have a great support community. However I’ve recently being trying out Chrome and I’ve been impressed, it’s as quick (if not quicker) than Firefox and is growing very quickly. I use both of these programs (one on my laptop and one on my pc) and I’d recommend either of these as an upgrade to Internet Explorer, just see which you like more! (Firefox Link)(Chrome Link)
![]() CCleaner – This was one of the best finds I had during my research. In a nutshell CCleaner cleans your pc from all the clutter and makes it run faster. It removes all the unused and unneeded files in your computer, cleans internet history and cleans your registry, and it does it all ridiculously quickly! (Download Link)
CCleaner – This was one of the best finds I had during my research. In a nutshell CCleaner cleans your pc from all the clutter and makes it run faster. It removes all the unused and unneeded files in your computer, cleans internet history and cleans your registry, and it does it all ridiculously quickly! (Download Link)
 7-zip – If you’re downloading zipped files that have extensions that windows can’t handle (such as .rar files) then I’ve found 7-zip to be the best option for my needs, it’s small and light but still powerful. (Download Link)
 K-Lite Codec Pack – I’ve tried a few of the alternatives to Windows Media Player (KMPlayer, VLC Player, DivX) but honestly I’ve found that it’ll play pretty much any video you throw at it once the K-Lite Codec Pack was installed, and no need to download new programs! (Download Link)
 iTunes – If you’ve got any kind of iPod/iPhone device then you’ll pretty much need iTunes anyway, it’s not the greatest music player in the world, but it works (once you give it time to warm up). A lot of people use it as well, and so if you’re on a network and have music sharing enabled, (like I was in my halls in my first year) that’s access to a lot of free music! (Download Link)
 Spotify – Spotify is great, it’s free streamed music that doesn’t take up any of your precious hard drive space, and you only have to listen to a short advert once in every 5 songs or so, which I don’t even mind any more (they’ve got to pay the bills as well!). The BEST thing about Spotify is that you can share a playlist with your friends and get them to suggest and add songs to it. This was great when we used to throw house parties, email the playlist to all your friends you’d invited, get them to add songs they like, hit shuffle and then everyone’s happy! Just another thing you don’t have to worry about. (Download Link)
 Skype – If you’re wanting to keep in touch with your family and friends over the internet then Skype is a great way to do that with both voice and video. It also supports up to 5-way calling in conference calls, so it’s great if you have a family like mine who are spread out all over the place! You can also get an online phone number that you’re family can call, so you might not even need a phone! (Download Link)
(If you’re in to gaming and don’t want to pay the money for a server for things like Team Speak or Ventrillo, then I’d recommend Xfire. The voice quality is OK and it definitely takes up less of your bandwidth than Skype, plus it integrates perfectly in to games like league of legends so you can see who’s talking on the actual game.)
![]() Gimp – Photoshop is great, but it’s expensive. So for those people who want a similar level of customisation, but don’t want to shell out the prices that Adobe charge, then Gimp is a great alternative. I started using it over 5 years ago and it suits my needs perfectly, there are also plenty of guides out there, and loads of brushes on places like Deviant Art. If you’re studying something that involves digital pictures or art then you’ll probably be working in Photoshop, but for everyone else I’d recommend it! (Download Link)
Gimp – Photoshop is great, but it’s expensive. So for those people who want a similar level of customisation, but don’t want to shell out the prices that Adobe charge, then Gimp is a great alternative. I started using it over 5 years ago and it suits my needs perfectly, there are also plenty of guides out there, and loads of brushes on places like Deviant Art. If you’re studying something that involves digital pictures or art then you’ll probably be working in Photoshop, but for everyone else I’d recommend it! (Download Link)
 BurnAware Free – If you’re burning any kind of file to DVDs/CDs/Bluerays then BurnAware Free is great for it. An easy-to-understand interface, quite a few options available (such as burning and making ISOs!) and it’s very quick and light. (Download Link)
 DVD Flick – If like me you’ve got some absolutely classic videos of your friends on your phone or iPod and you want to share them, then DVD Flick is great for making your videos play on your DVD player. It’s easy and will convert your files to PAL/NTSC before it writes them to disc, and allows you to add a title screen and chapters to your creation, perfect for making simple home videos. (Download Link)
 Object Dock – I’m a big fan of docks and would recommend them to anybody who tends to find their desktop gets a bit cluttered. As soon as I saw a dock on my friends Mac I knew I wanted one for my pc. Although the free version of object dock is great, I’m still searching for a free dock program that lets you create a ‘folder-tree’ when you hover over a dock icon. Until then I’ll keep using Object Dock, and would recommend it to people who haven’t yet tried using docks, or who don’t quite need the level of cutomisation of something like Rainmeter. (Download Link)
![]() µTorrent – I used Vuze for a good while but found that they just kept adding more and more features to it, making it bigger and slower, and so I went in search for another BitTorrent client. I found µTorrent and haven’t looked back since. It’s probably the lightest client out there without sacrificing functionality, and you can even stream videos as you download them if you can’t wait! (Download Link)
µTorrent – I used Vuze for a good while but found that they just kept adding more and more features to it, making it bigger and slower, and so I went in search for another BitTorrent client. I found µTorrent and haven’t looked back since. It’s probably the lightest client out there without sacrificing functionality, and you can even stream videos as you download them if you can’t wait! (Download Link)
![]() Lazy Meter – This isn’t a program you can download like the rest of the list, but I had to include it as I’ve found it to be invaluable to me in terms of helping me be more productive and getting things done. And the best thing about it is how simple it is. They’re in development of an app, and hopefully soon they’ll add offline compatibility, but it’s a great new tool if you find yourself a bit of a procrastinator. (Website Link)
Lazy Meter – This isn’t a program you can download like the rest of the list, but I had to include it as I’ve found it to be invaluable to me in terms of helping me be more productive and getting things done. And the best thing about it is how simple it is. They’re in development of an app, and hopefully soon they’ll add offline compatibility, but it’s a great new tool if you find yourself a bit of a procrastinator. (Website Link)
UPDATE – Microsoft Security Essentials
I have realised that when I originally compiled this list, I missed out quite a vital program for modern computers; Virus Protection. A lot of companies try to scare people and charge you a lot of money to keep your computer safe. I converted to free anti-virus software very early and have never had a problem. Originally using programs such as AVG, and Avast! I have recently been converted to Microsoft Security Essentials, it not only covers your computer from viruses, but also provides spyware and malware protection for a safer internet experience. It’s light, doesn’t take up nearly as much processing power as other free software and it’s a single program covering everything in one. I converted to this over a month ago and have been very impressed so far, definitely recommended. (Download Link)
– x –
If you find that the programs above don’t suit you, then here are some other FREE alternatives. I’ve tried all of them, and there’s nothing wrong with them, I’ve just found that the ones in my main list were more suited to me.
Alternatives:
Productivity Suites – It used to be just open office, but recently the company has split into Libre and Open. At the moment it seems Libre is looking better for the future, but Open Office is still a good alternative.
PDF Readers – Not liking Sumatra? Try FoxIT Reader or Cool PDF Reader. They offer various levels of depth, but for me Sumatra was great.
Video Media Players – Want a change from Windows Media Player? Try these out: KMPlayer, VLC Player, DivX
Audio Media Players – Not in to iTunes? Most of these offer great customisation and are still compatable with your iDevice! : Winamp, Songbird, MediaMonkey.
BitTorrent Clients – If you’re looking for an all-in-one client instead of a light one then give Vuze a go.
– x –
I hope this list helps people save some money! And good luck if you’re just starting university. If you think I’ve missed anything, or disagree with anything then please let me know! Any other comments welcome.
Until next time!
North American Tea Tour
After being back in England now for over a week, having had time to get my body clock sorted, fill myself with good quality British food, and converse with people who speak properly, I’ve actually had time to sort some of my Canadian photos out.
I found out that actually during our ‘Man-Plan’ trip we’d had quite a few cups of tea, which isn’t as easy as it should be in North America with their ‘coffee’ everywhere instead.
Therefore, in honour of that I’ve dedicated an album to the times in North America where we were able to have a good ol’ cuppa (well… the closest equivalent they had there, ‘Orange Pekoe’ or ‘English Breakfast’ apparently), flying the flag without even realising it!
Ste
Man-Plan Phase 4: Seattle (pt 2)
Now we come to the end of the Man-Plan tour of a very small part of what North-Western US and Western Canada have to offer. The last part of our tour takes us to the ‘Gum Wall’, the Space Needle and finally geeking out in the Star Wars exhibit.
This marked the end of the tour for myself and Sam, I flew back to Toronto for my last few days in Canada, whilst Sam made his way to Vancouver to catch his flight back to the homeland. Needless to say that after a few months of living and travelling together, that it became emotional at the end… at least it would have been if we both weren’t fully grown men…
Anyway, I now return back to Toronto, hopefully seeing some of my old friends there, for a final hurrah before I return back to the UK, pretty much a full 11 months after I left. More on that next time!
Ste
Man-Plan Phase 4: Seattle (pt 1)
The next phase of the Man-Plan was to go south of the Canadian border to the USA and spend some time in Seattle.
In our first couple of days there we went to the Experience Music Project for a Nirvana Exhibition, random jam sessions and a lot of guitars (there was also a section on Battlestar Galactica… but neither of us knew anything about it, so we didn’t really go in). And we made our own band and recorded a DVD! We decided to call ourselves ‘Stodge’ which of course is a combination of the words ‘Stoic’ and ‘Dodgy’… we decided not to buy the DVD…
After all the excitement of the EMP the next day will followed it up with an epic trip to the Seattle Zoo… need I say more?
The last pt of the last phase of the Man-Plan coming soon!
Ste
Man-Plan Phase 3: Victoria
So after Vancouver we took a ferry over to Victoria, on Vancouver Island. The island very much reminded us of back home in Britain (other than the fact they drove on the wrong side of the road…) but it was a weird experience being the furthest away from home I’d ever been, yet it being so similar. We had fish & chips with proper curry sauce and mushy peas!
We managed to exlore quite a bit of the city, went around the park there (which was beautiful… but my camera ran out of battery half way round), enjoyed a few pints at ‘the sticky wicket’; my new favourite name for a pub, and went to one of the best museums I think I’ve ever been to… I took quite a lot of pictures here, so sit back and enjoy Victoria:
The next on the Man-Plan: Seattle. We’ll be travelling south of the boarder to the US, and see what the Yanks have to offer us!
Ste
Man-Plan Phase 2: Vancouver (pt 3)
Now to our final days in Vancouver. We decided that we’d take it easy for our last couple of days so we went to Granville Island Market (and the Kid’s market!) and then took a leisurely bike ride around Stanley Park! Here is a summary of those two days in picture form:
Those of you following the man-plan (so, obviously all of you…) will note that after our time in Vancouver we’d go over to Victoria on Vancouver Island which is apparently meant to be ‘the most British city in Canada’. We were excited for fish and chips.
Ste
Man-Plan Phase 2: Vancouver (pt 2)
After settling in Vancouver a bit, Sam and myself (aka ‘The Febreze Brothers’… because we’re so fresh…) decided on having a little cultured day and took a ‘little’ walk to the Museum of Anthropology. We learned lots. And stuff. Pictures now.
One more upload of our time in Vancouver to come: The ‘Febreze Brothers’ go to market! Coming soon…
Ste
Man-Plan Phase 2: Vancouver (pt 1)
So after an interesting overnight journey on the coach we arrived in Vancouver, and the first city I’d been in for 6 months. The first full day we were there we went to the aquarium, and generally wandered around exploring for a bit. I have to say I’m a big fan of the city, especially the Stanley Park area and other random little quirky buildings dotted around the place that make it stand out from other cities.
More photos of our other adventures in Vancouver coming soon; including the Museum of Anthropology, Exploring Granville Island, and a bike ride around Stanley Park, as well as other more random antics!
Ste
Man-Plan Phase 1: Jasper (pt 2)
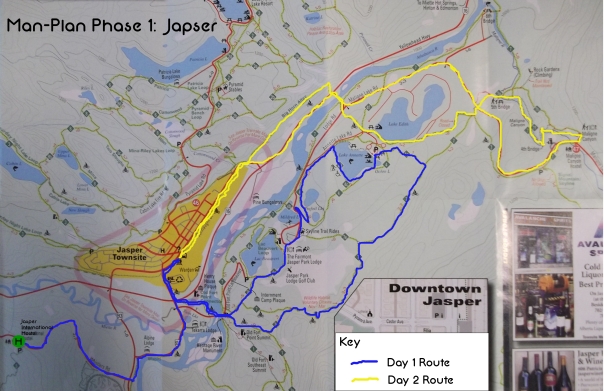
Jasper was in a bit of a transition phase as spring was slowly creeping in, and being a national park, we thought it’d be a good opportunity to do some hiking on some of the trails Jasper had to offer. Hopefully seeing some beautiful views and a bit of wildlife on the way.
Here’s a map of the routes we took:
And here’s some of the photos from over the two days we spent in Jasper!
Next stop on the Man-Plan tour after a 12 hour, overnight coach journey: Vancouver
Ste
Man-Plan Phase 1: Lake Louise (pt 1)
After completing my winter season at Kicking Horse in Golden, we began the ‘Man-Plan’. The first stop on our well-earned travelling holiday was Lake Louise. We only stopped here for 6 hours on the way to Jasper, but managed to get a few photos of our time there.
Winter was still hanging on stubbornly by its finger tips, so it wasn’t the best day in terms of visability, which was a shame as Lake Louise is meant to be one of the best views in Western Canada, but it was still pretty awesome. Check it out.
Next stop on the Man-Plan expedition: Jasper
The Man-Plan!
I have loads of photos to upload of my adventures since being in Golden, BC, but they may be a while, and might have to actually wait until I get back to the UK.
Until then, I’m getting close to the end of my stay in Golden, and have a little bit of time to go travelling before I have to catch my plane back to the homeland. So to that end me and Sam (who will be joining me on some of the journey) have come up with a little travel itinerary, starting at Golden and with me ending up in Toronto, AKA the ‘Man-Plan’.
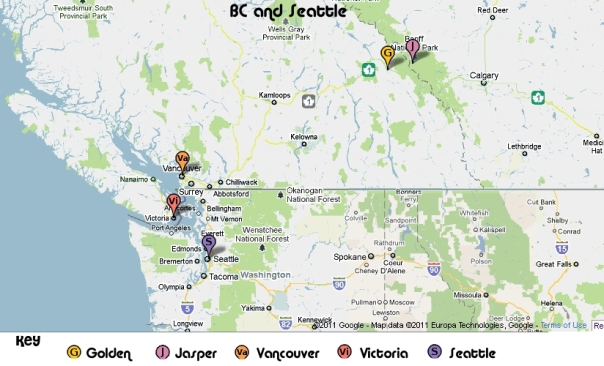
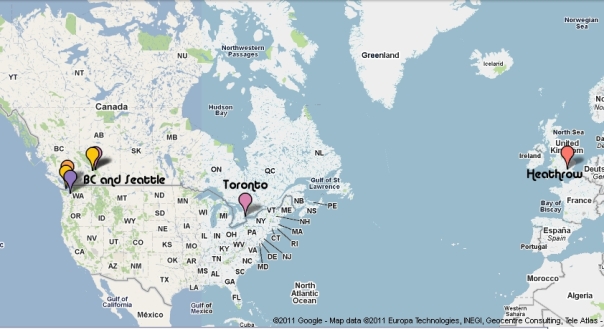
I’ve added a couple of maps as well for those who like pictures.
THE MAN-PLAN
The journey begins with us leaving Golden on the 14th April for Lake Louise, in Jasper National Park. We’ll spend 3 days in Jasper, taking in some of the natural beauty, outdoor activities and hopefully wildlife (I still haven’t seen a bear yet!) that the biggest of the Canadian Rockies Parks has to offer.
We’ll then leave Jasper for Vancouver on the 17th April, travelling overnight on apparently one of the most beautiful coach journeys in the world. Arriving at Vancouver; the city which is ringed by the Pacific ocean and snow-capped coast mountains, we’ll spend 5 days sampling a tiny bit of what the city has to offer, before heading off again over a stretch of water to Vancouver Island, to visit the capital of British Columbia: Victoria.
We’ll then spend 3 days in Victoria, described as a “small, sedate city with quaint English air, leafy old town, delightful old-fashioned shopping streets and exquisite harbour”. Apparently as well it’s got a cracking museum!
Travelling across waters known for whale-spotting, we’ll briefly make our way out of Canada and travel to the American city of Seattle. I’ll see what the Yanks have to offer and if they can match up to the experience the Canadians have given me so far. 5 days in Seattle, exploring the sights and the aquarium, and then I’ll make my triumphant return to Canada, and more specifically back to Toronto on the 30th April.
Spending 4 nights back where I first started my journey nearly 11 months previously seems a fitting way to also end it. So I’ll return to Toronto, perhaps push the boat out and enjoy a few fizzy drinks and milkshakes in the evening with some friends, before I say “Goodbye”, or rather “See you soon” to my North American adventure, and “Hello again” to the homeland. After flying overnight I’ll arrive back to a hero’s welcome in Heathrow in the early morning of the 6th May.
Well… that’s the plan anyway.
Hello Golden!
My trip to Golden involved various forms of transportation; planes, trains, buses, coaches, taxis and a fair amount of walking got me from Toronto, to Calgary and then eventually to Golden. I quickly found out that I was the last person to arrive in my hotel (which is more like uni halls of residence than a hotel) and that some people had been living there already for 2 weeks!
My orientation followed the next morning, as well as the Christmas parade and a screening of a film about snowboarding, which I don’t think I fully comprehended yet, but hopefully by the end of the season I’ll be able to appreciate it more completely.
My halls are directly above one of the three bars in Golden (just like in HIMYM… unfortunately it’s not called McClaren’s…) making it very easy for us to nip down and grab a quick pint! Golden itself is a picturesque little town of about 10,000 people, there aren’t very many shops and only one bank, but has everything really that you need there. A complete contrast to my experience in Toronto! The resort itself is awesome so far, as I’m writing this we still haven’t opened to the public and are still in training, so it’s been pretty quiet in terms of work.
I have taken a few quick pictures around town, but there’ll definitely be more to come relating to the mountain I work at, especially the views from the Eagle eye restaurant at the top. Anyway, until next time… enjoy!
Goodbye Toronto
My last few weeks, as you can no doubt imagine, have been slightly hectic what with all the planning needed for my new job, accommodation and new (much colder) conditions. Never mind how I was going to get to the town of Golden, BC from Toronto, Ontario and that I had to organise a going away party before I left.
The last week or so in Toronto turned out to be a little more eventful than I had anticipated, which is always a pleasant surprise. The reason that I haven’t blogged anything recently is because there has been very little to say about my adventures. I had got into a ‘routine’; a word that divides our lovely species, bringing some order, bliss and comfort, and trapping others in a mundane world of boredom. Luckily I am a person who can deal with a routine… for a couple of months at least. However with a routine came a lack of time to explore the wonderful experiences that Canada had to offer, and so hence my lack of blog updates. That and my camera has defiantly decided that it didn’t want to work any more and has been retired for the past couple of months, meaning no pictures of any adventures I may well have had.
I have recently acquired a new camera however, as I felt that my current town of residence has an aesthetic value that many of you will appreciate, and that I’d like to appreciate when I’ve left. Pictures coming soon!
So I suppose this is a thank you, and a goodbye Toronto! It’s been a blast, and I’ve thoroughly enjoyed the 5 or so months that I’ve lived there, the people that I’ve met and the places I’ve been. Although I could quite easily have lived there for my entire year in Canada, and will miss a lot of people, I think it’s time for me to move on and start a new adventure… To Golden!
Some of the pics of my last couple of days in Toronto… including a Raptors game!
Celebrity Two Word Tango… The Drinking Game
Celebrity Two Word Tango (CTWT) was made famous a few years ago on the ‘Chris Moyles Show’ on BBC Radio 1. I actually used the game in my gap year before university, and found it to be a very good ice-breaker.
However the other night when my housemates and I had cracked open a few beers after work, we were looking for a new drinking game when I remembered CTWT. We were able to find a stream on the internet and started playing with much hilarity!
The link for the CTWT is hosted on Chris Moyles’ own website (chrismoyles.net) and can be found here.
So here’s the Kaluuja guide to:
The Celebrity Two Word Tango Drinking Game!
- The rules for the normal CTWT game still apply, a group or people each takes it in turn to say the name of a celebrity in the gap in the music. No repeats!
- Here’s where the drinking comes in… After your go, you have to take a sip of your drink (or do a finger… or a shot, depending on how hardcore you are). This can get quite hectic when the music speeds up towards the end!
- If you make a mistake… you pause the music, drink your forfeit (whatever you decide upon, we did 2 fingers worth, for example) and begin again, starting with the ‘forfeitee’.
Well that’s basically it for the normal game… obviously when you get good at it then you can add additional rules, or any that you make up on your own! (We found the no-pointing rule was an effective one for the more excitable in the group!)
Other optional rules to get you going
- If your group is big enough then you can play the knock-out version, if you mess up, then you’re out of the game! (and have to do a large drinking forfeit)
- Introduce some of the ‘international rules of drinking’ whilst playing the game.
- Add a thumb-master to the game, whilst naming the celebrities.
If you can think of any others then please comment and I’ll add the good ones! Other than that… give it a try, and have fun!
The link again for the CTWT jingle can be located here and all credit goes to the Chris Moyles team and chrismoyles.net for creating it!
Vinyl Bowls
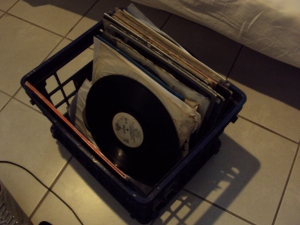
I was walking back home from work the other night, when I saw loads of boxes full of vinyl records on the street. Now the thing about Toronto for those who have never been here are that there are few charity shops, so people put things that
they don’t need out on the street (usually furniture, which is how we’ve furnished most of our apartment actually), and if it’s on the curb… then it’s fair game!
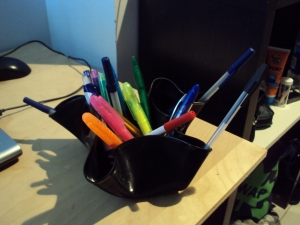
So I picked up as much as I could carry and took them back home, as my roomate is a DJ. Sadly only 2 of the records were any decent, so we were stuck with loads of vinyl that we didn’t need… so what did we do with them?
Welcome to the Kaluuja guide to making a vinyl bowl!
Step 1: Get some old vinyl records that you don’t need.
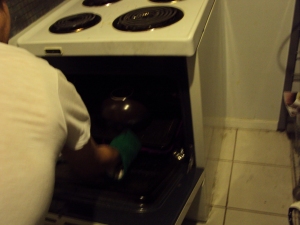
Step 2: Pre-heat your oven to 200C
Step 3: Put your vinyl record onto something roughly the shape you want your object to be (e.g. if you want a bowl, put the vinyl on an upside-down bowl so that when you heat it, it will droop over the bowl).
Step 4: Leave the vinyl in the oven for about 4-6mins
Step 5: Take out and shape whilst still warm and flexible
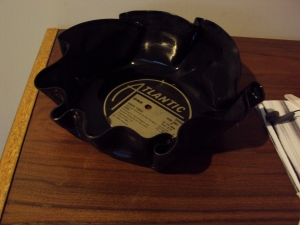
Step 6: Let it cool and enjoy your new vinyl bowl! (Or pen holder…)
We ended up making a pen holder and a bowl in the time we had. See if you can get creative and make something as well!

